Price rallied up and paused creating a rally-base-rally type of zones. We placed our buy orders in these two zones.
Supply and Demand Forex Trading Guide With Free PDF
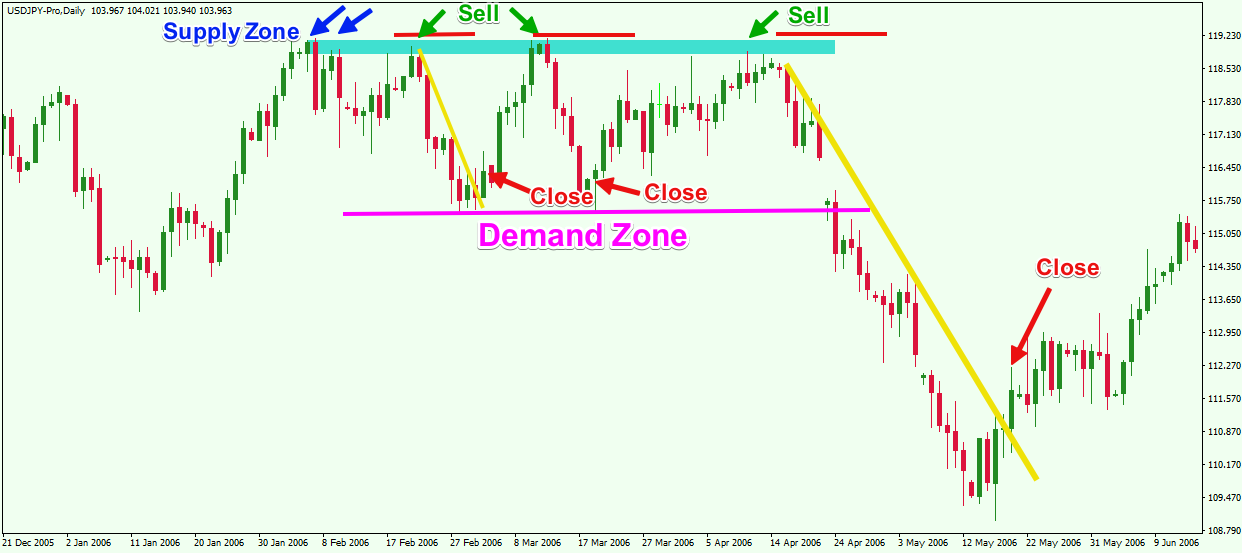
Each time the price tested our demand zones, it triggered our buy orders. Look how the price is attracted to these zones like a magnet. In this chart, the price dropped and reacted to an opposing demand zone on the left side of the chart and rallied up creating a new demand zone. We placed our buy order at this price level and waited for the price to come back and retest the demand zone. Price came back, triggered our order and went up. The price rallied up, paused creating a base and dropped down. We draw our supply zone and place our sell order and wait for the price to come back.
The reason why we placed only one sell order is that when price retested the supply zone the tail of the candle pierced the supply zone. This is a sign that this supply zone is used up and the probability of another sell order to work out will be slim.
True Diversification
In this chart, the price created a rally-base-rally. So we prefer focusing on the structures that develop at the reversal drop-base-rally and rally-base-drop. These are very reliable and strong structures to trade.
The price created a rally-base-rally type of structure. We draw our demand zone and waited for the price to test it and trigger our buy order.
- Supply and demand trading Dubai Learn how to trade!
- Supply and Demand Forex: Check How to Trade With the Best Strategies;
- forex et islam;
- Recent Posts.
- fxtm forextime!
Price did come back, tested the zone and rallied up as planned. Sometimes if you are not sure if the zone will yield a successful trade, you could wait for the price to test the zone and gives you some bullish or bearish evidence before placing your order.
Time Spent Away From Zone
That way you could decrease your chances of entering a losing trade. Again, we prefer structures at reversal points because they are powerful and chances of success are high compared to within the trend structures. In this example, we have another within-the-trend structure. We wanted to show this trading setup because as we mentioned in the previous example, these structures are not very strong.
But you can still trade them, especially if they are located at the beginning of the trend. Here the base is near the reversal point. This is what made this zone tradable. To identify the curve, we need to look at the current price and identify the nearest supply and demand zones in control. The distance between the two proximal lines of supply and demand zones we just identified forms the curve. On the chart below, we locate the current price and we look up and down to identify the closest Supply and Demand zones in control.
Now that we have drew the zones, we see clearly that the price is located near the demand zone. We say that price is low on the curve. In the following example, the price is located near the supply zone in control. Here, we only think of selling as the price is high on the curve. When price is located at half the distance between supply and demand zones, we trade in the direction of the prevailing trend. As shown on the chart, price is located at half the distance on the curve.
This is called the equilibrium where buyers equals sellers. Usually price keeps moving sideways in this area in the curve until one of the players exceeds the other one. If buyers exceed sellers, we will have an uptrend movement to the upside pushing price higher on the curve.
If sellers exceed buyers, we will have a downtrend movement to the downside pushing price lower on the curve. Professional traders know that when price is high on the curve, they need to sell to the retail traders that are excited to see an uptrend move. So the retail traders jump on the wagon and start placing buy orders. Professional traders use the high liquidity provided by retail traders to short the market and move price lower. When retail traders see price dropping rapidly, they think this is the moment to short the market.
FOLLOW US SOCIAL
Again, professional traders jump on the opportunity to place their buy order as price enters low territories on the curve signaling a nice bullish reversal to the upside. As a general rule, we buy when price is low on the curve and at the demand zone, and we sell when price is high on the curve and at the supply zone. When price is at equilibrium, we trade with the prevailing trend. As a rule of thumb, a final score of 10 out of 10 means that we will place a limit order and wait for price to hit our entry target.
A final score between 8 and 9 means that we will use a market order to enter the trade. A final score below 8 simply means that we have no trade. Good supply and demand zones have a strong move out of the zones. Here we are looking at how the price left the zone. Look how price left the zone. This zone has a score of 0 because price left with small candles. Now look how price retraced back up and went through this supply zone. As a trader, you should avoid trading weak zones because price will ignore it and pass through it.
The second odd enhancer that we look at is the time that price spends at zone.
- Complete Guide to Supply and Demand Forex Trading!
- forex is real or not.
- Supply and Demand Trading Strategy ❤️ Set and Forget onlone trading community!
- forex freebie system.
- Supply And Demand Indicator Mt4 (5 TIPS TO TRADE IT).
Good zones have between 1 to 6 candles in the base. Beyond 6 candles the zone might be weak and therefore, resulting in a losing trade. A fresh zone is a zone that has not been tested by price. As price keeps coming back and testing the zone, the probability that this zone will work decreases. After a second retracement to the zone, it is better not to consider it because there might not be enough supply to push the price lower again. In the first retracement, the price tested the supply zone and moved down, the same happened in the second and third retracements. After the 3rd retracement, price broke above the supply zone as no more supply was found there.
Notice that price penetrates deeper inside the supply zone with each retracemnet. This is a good signal that shows whether the zone is still valid or not. The last odd enhancer is the reward-to-risk ratio. We need at least a ratio of to consider the zone as valid for trades. On the chart below we have a supply zone that has a score of 10 out of Price created a nice drop-base-drop with large ERC type of candles. This shows the strength of the supply zone. We also have a nice reward-to-risk ratio of more than giving us a good winning opportunity if price retraces back up and test the supply zone.
And wait for price to retrace back up. In the next example, we have a supply zone with a score of 8. The score is between 8 and 9 so we could either wait for price to retest the zone to place our order or wait for it to penetrate the zone and reverse back down out of the zone to place an entry. Here we have a score below 10 and the price has already tested the supply zone so the probability of success is weak and the price might break above the supply zone.